Friday, June 17, 2011

Ravishing in Red: My Pedestal Table

In April, our church had a rummage sale to raise money to fill backpacks with school supplies for local families who could not afford the expense for their elementary school aged children. Of course, I went to look for treasures, volunteer, etc. I scored my fabulous new kitchen canisters for $4 and went back and forth debating on whether I should buy a lonely little black pedestal table. One of the church ladies said she would give it to me for $2, but I went ahead and paid full price - a whopping $5 to help fill the backpacks.

The table was nothing special... manufactured furniture, rough shape, and covered in stickers. I figured at the very least, I was making a donation. So, I got the table home:


 My mother came over later that day, takes one look at the table, and told me she garbage picked it and donated it to the church rummage sale, despite my father's suggestion that she ask if we might want it. So yes, I paid $5 for the table my mom got out of the garbage. Oh well, it's all a good cause!

Anyways, months went by, much rain was had, weddings were attended, and other projects took priority.  I finally decided where I was going to put the table this weekend.

First order of business was sticker peeling. In this picture, you can kind of see superman, a vampire, and a partially peeled ghost. Must have been a little boy's nightstand.


 I then picked up a couple cans of Wagon Red NOW spray paint at Valu. The price tag said $1.97, but they both rang up at 99 cents. Score!


I was too lazy and cheap to prime.  I figured I didn't want candy apple red, and if everyone is so big on black glaze over solid colors, why not just let black show through the paint?

Anyways, I gave it about four coats and switched out the knob for a lovely new silver pull.


Do you like my helper?


Anyways, here's the table drying:


Annnd, in place on my porch:


To break it all down, the table was $5 (going to a good cause), the spray paint was $2 for 2 cans, and the knob was $1.50. Not bad for an $8.50 investment!


Redoux

Saturday, May 7, 2011

Goody Goody Gumdrop - Impossible to Clean Lawn Furniture


A long time ago, my grandmother had three white, plastic Adirondack chairs. She got tired of cleaning them.

A not quite as long time ago, my father had three white, plastic Adirondack chairs. He got tired of cleaning them.

A not very long time ago, we bought a house and were then gifted these three white, plastic Adirondack chairs.

They are IMPOSSIBLE to clean. We tried everything. Regular cleaner, bleach, tire brushes, scrubbing, soaking.... I think we only succeeded in polluting the plants next to the driveway.

Here are closeups of the dirt:


And mind, this was AFTER they were "cleaned". You'd be afraid to sit on them in white pants, even though they've been soaped and scrubbed!

Considering the chairs were free to us, we decided it would be spray paint to the rescue! I know plastic doesn't take spray paint well, but I figured even if it only lasted one season, the cost of a couple cans is less than buying new chairs that nobody is afraid to sit on.

After a little research, I decided Krylon Fusion for Plastic was the way to go. With a hunter green deck and butter yellow house, the only color to go with was (and I swear my husband agreed to this) purple!  A color called Gumdrop to be exact.


The Fusion seems to be holding really well to the plastic and seems to cover well enough. My one complaint would be that a can doesn't seem to go very far.  We bought three cans, and only got two chairs done well, and one that will stay in the garage until needed due to blotchy-ness...


At the end of the day, I don't think the purple is too much and I do think I like my new chairs!

Rustoleum Hammered Finish and Dollar Store Treasures

Last month I ordered a patio indoor/outdoor citrus trio from Gurney's. In anticipation of the arrival of my Meyer Lemon, Meyer Lime, and Venus Orange trees, I set out to find the perfect pots for my new little plants.

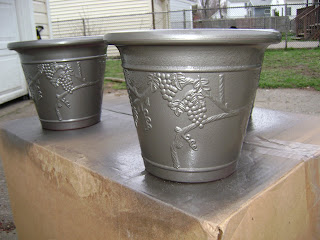
What I found at the Dollar Tree were these 8.25" plastic pots:


 I loved the size, the grapes, the price... everything except the chalky red plastic.  So, I sent my husband looking for some of that Rustoleum  Hammered Metalics spray paint. I was hoping for a darker than copper, but still slightly orangish finish, so I guessed and asked for "Bronze". Well, they had "Dark Bronze" and that's what he came home with:


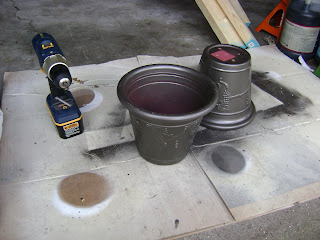
It's actually much more petwer-y than I was hoping for, but figured what-the-heck.  Husband actually took over the painting on this one.


This is what they looked like painted:


Two weeks later, my trees arrived! Woo!  We first had to drill drainage holes in the bottom of the pots.


A little Miracle Grow potting soil, my new trees, and here we go:


 If you're wondering why there are only two trees, it's because my Venus Orange arrived like this:
Awaiting reply from Gurney's!

Annnnd BORING BONUS Time!

Figured we'd try the leftover paint on our yucky mailbox (which came with the house). The can says it sprays directly over rust with no prep work.


Still boring, but better. Painted well over rust, but is chipping where the lid hits the front. Still needs something extra....


Sunday, May 1, 2011

Spray Painting Ceramic: My New Kitchen Canisters

Finally! It's been the rainiest month here since 1961 and we finally had a warm, sunny Saturday. I decided to take advantage of this hint of spring to cut down on my list of projects.

Meet my new kitchen canisters:

Nice, aren't they?


You may remember how they started out.... a $3-for-the-whole-set church rummage sale find. With blue bows. And teddy bears. And more bears. And more bows.


After running the canisters through the dishwasher, I decided to give all the canisters a light sanding, hoping it would make the paint stick to the glossy surface better. I don't think it did much good, except to make sure the surfaces were *really* clean.


Then, I taped plastic bags on the inside, since I didn't want to spray paint the parts that would be touching food.  Taking everything outside, I gave it all a good coat of spray primer.


To be honest, I probably would not use primer on glossy ceramic again. It was just too chalky and flaky to stick durably to the finish. Oh well, live and learn.

Up next was the real paint. I chose Rustoleum's Universal All Surface paint in Real Almond gloss finish. This was partly because I liked the color, and partly because it was on sale at Jo-Ann's for $3.


To review the product, I think the nozzle is funny. Every time I hit the trigger, it would start with a sputter, spewing out uneven blobs of paint. The paint might be ok, but the mechanics of the can design are off. I would not buy it again.  Anyways, I gave it a few light coats:


When they were dry, I brought them in, tied some jute twine around the tops, and voila! My new canisters:


I wish I'd skipped the $4 can of Rustoleum American Accents spray primer, but for the price of a can of spray paint, my $3 canisters look pretty darn good. Don't you think?


Redoux


Sunday, April 17, 2011

Rainy Day Project: or Removing Water Stains from Old Furniture

Today is COLD. And drizzly. But I was anxious to get a move on some projects.

We rescued the headboard on a rainy day, and unfortunately it got these icky white water stains. I love the color and finish, so I was hoping I wouldn't have to sand and refinish it. Not to mention what a pain it would be to get into all the details!


I decided to jump straight to the easiest possible solution: Old English Scratch Cover (for dark woods).


If you're doing this at home, I would recommend using a soft cloth, and not paper towels, but I didn't have any handy.  Following the directions on the bottle, I gave it a good coating, a little elbow grease, and wiped away the excess.  Today must have been my lucky day...


No more water marks!  While I was at it, I did the rest of the headboard to even out the tone and take care of any worn spots.   I'm anxious to get the rest of this project rolling... Check out the gorgeous carving on this headboard.


I'm glad we rescued this one!

Saturday, April 16, 2011

Just wanted to share...

THESE devastatingly stylish canisters are the new residents in my kitchen.  I'm thinking a good coating of bronze? Stay tuned!

Upcoming projects...

Ok, here is a brief rundown of some waiting projects.

1. $5 Table


                                      Like the stickers?


2. Curbside Headboard... This one will be repurposed into something special!


3. Country Chair


Other things on the list are painting some impossible-to-clean white plastic Adirondack chairs, various garden things, and a set of lovely teddy bear canisters....

P.S. Anyone have any reccomendations for a new camera?

The chairs that started it all....

Welcome to my first post!  As projects stack up waiting for the first hint of warm weather, and cans of spray paint sit cooling their heels, I figured I'd make use of the time by showing you the chairs that started it all....

Project 1: The First Garbage Chair.

We found this little beaut sitting next to our old dumpster. Someone was moving and this chair did not make the cut. I loved the style, but the tan pleather, cushionless seat needed to go!


Bring in the staple gun, clearance fabric, and a piece of foam!


 Ta-Dah!

Project 2:  Craigslist Dining Chairs


When we bought our house, we bought a beautiful dining set off of Craigslist.  However, the family had little monsters of destruction kids.


Same staple gun to the rescue! Annnnd the after:


There you have it. Nothing spectacular, nothing complicated, but I've caught the bug!

I promise better photos and tutorials in the future!
Thanks for stopping by and hope to see you soon....